How to Setup a Tomcat Cluster in 5 Minutes with Bear
In this article I will show how to use Bear to:
- Install JDK, Maven and Tomcat to your cluster
- Make Tomcat multi-instance configuration per each host
- Start, stop and check status of the Tomcat services
- Run remote commands to manually test that everything is ok
Background
Bear is a lightweight remote automation tool for Groovy/Java/JVM. Bear differs from other existing tools in that it's using programmatic approach. In Bear your deployment is a regular Java class which can be run via main(). Bear loves static type safety, chained method calls, FP and fluent programming techniques.
Installing Bear
Bear requires:- 1+ remote machine with Linux, standard password authentication
- JDK 8 EA (recommended for UI), JDK 7+ to run console/UI
- Maven 3+.
mvnmust be available in the command line. How to install Maven on Windows
To install Bear, type in your command line (admin rights might be needed):
$ mvn com.chaschev:installation-maven-plugin:1.4:install -Dartifact=com.chaschev:bear
Creating a Project
Create a directory or use an existing for you deployment, then
$ mkdir tomcat-demo
$ cd tomcat-demo

# generates a new project for your hosts, i.e. vm04, vm05, vm06
$ bear --create tomcat-demo --template java.tomcat --hosts="vm04,vm05,vm06" --user your-ssh-user --password your-pass
Here java and tomcat are the tags to add features to the generated project. Note: if you plan to use not the latest update of the JDK (7u51 by the time of writing), you need to specify your Oracle.com credentials by providing --oracleUser and --oraclePassword.
Specify versions
Open the generate project in .bear/TomcatDemoProject.groovy and edit configuration to set the version of the tools to install:
@Override
protected GlobalContext configureMe(GlobalContextFactory factory) throws Exception {
  java.acceptLicense.set true

  java.version.set "7u51"
  tomcat.version.set "7.0.50"
  maven.version.set "3.1.1"

  bear.appStartTimeoutSec.set(600)         // override startup timeout for Tomcat

  ...
Add Tomcat Instances
Instances are added by simply enumerating ports. All other internal Tomcat ports will adjust accordingly per each instance:
tomcat.instancePorts.set "8080, 8081"
Run Installations
Now we are ready to run setup. To get the best results make sure you have no JDK installed on your machines. If you do, you might want to uninstall them or you could leave it as is and Bear will overwrite references like /usr/bin/java and /usr/bin/javac
$ bear tomcat-demo.setup
tomcat-demo is the name of our project and setup is the name of the method in this class (actually it's a method of a super-class). This task will install JDK, Maven, Tomcat and will also create services and shortcuts to run scripts. There is also instruction of how to run a project via an IDE. If everything is ok you should see the Bear's UI as on a screenshot:
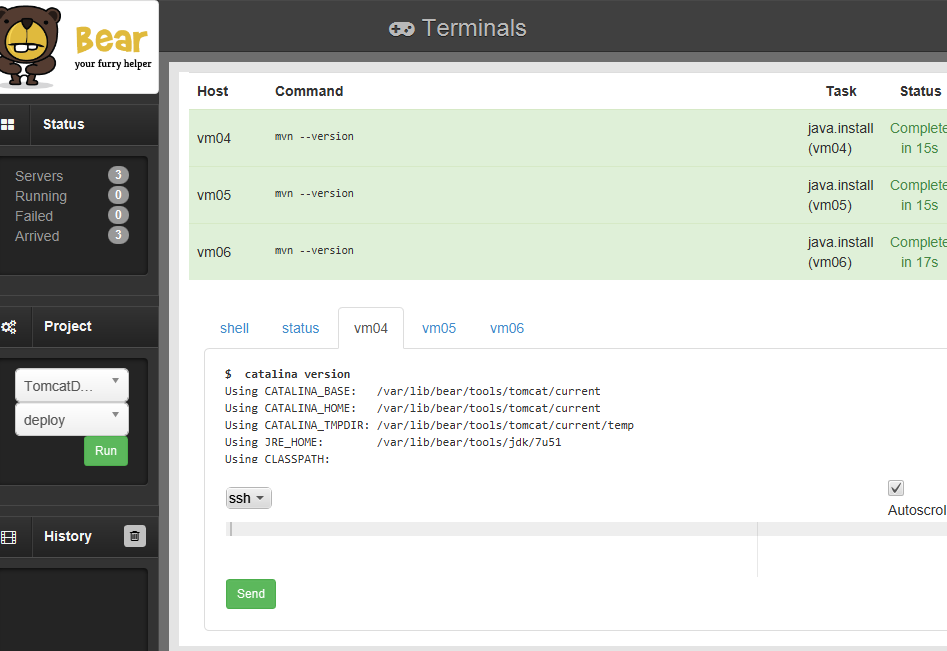
Start & Stop Tomcat Instances
In the UI click the status tab and type in the prompt:
tomcat-start
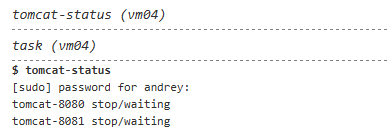
tomcat-status
To check the status or stop the instances use tomcat-status or tomcat-stop. Click any of the hosts tab, at the bottom of the scroll you should see:
Note: normally when deploying a project you would just do $ bear tomcat-demo.deploy to deploy it and restart the services.
Verify Manually
For those who are like me curious how the whole thing works and configured, select any of the host tabs and type
ls /var/lib/bear/tools/tomcat/current/ -w 1
..
bin
conf
instances
lib
logs
webapps
work
Gives you the list of Tomcat's home. Everything as usual except the instances folder, which contains runtime and configuration per each instance:
$ ls /var/lib/bear/tools/tomcat/current/ -w 1
tomcat-8080
tomcat-8081

$ ls /var/lib/bear/tools/tomcat/current/tomcat-8080 -w 1
conf
logs
webapps
To manually start/stop instances or edit upstart scripts, type:
# Prints the service commands for your OS
cat `which tomcat-status`

# Prints the status for an instance, comes from previous command output
sudo service tomcat-8080 status
sudo service tomcat-8080 stop

# Will print the upstart script content
# This script defines the Tomcat service in the OS
cat /etc/init/tomcat-8080.conf
Results
In this article I showed you how to quickly setup Tomcat environment with Bear. So you can from now drop your WARs in the created webapps to deploy your projects. You can also use Bear for this and it will allow you to do additional things like checking out your project from version control, building your WAR, creating a release folder for it, rolling back to one of the previous releases.
Have fun with your deployments!
Andrey.
Downloading Java with Java - the Longest JourneyA shortcut to 100 easy steps to download Java. |
How to Setup a Tomcat Cluster in 5 Minutes with BearA quick step-by-step guide. |
HeyI'm creating a blog at GitHub pages! |